How to Make Authentic Nepali Momo Dough: A Culinary Journey
authentic Nepali momo dough

How to Make Authentic Nepali Momo Dough: A Culinary Journey

Master the art of creating supple, flavorful momo dough for an unparalleled homemade dumpling experience.

Start Rolling Today

Key Takeaways

  • ✓ The secret to perfect momo lies in the dough's elasticity and hydration.
  • ✓ Authentic Nepali momo dough typically uses only three core ingredients.
  • ✓ Resting the dough is a crucial step for achieving pliability.
  • ✓ Rolling technique significantly impacts the momo's final shape and cooking.

How It Works

1
Gather Your Ingredients

Ensure you have high-quality all-purpose flour, water, and a pinch of salt. Precision in measurement is key for consistency.

2
Mix and Knead

Combine flour and salt, then gradually add water, kneading until a smooth, elastic dough forms. This process develops the gluten structure.

3
Rest the Dough

Cover the dough and let it rest for at least 30 minutes, or up to an hour. This relaxation period makes the dough easier to roll and more pliable.

4
Roll and Shape

Divide the rested dough into small portions, rolling each into thin, uniform circles. These will become the perfect wrappers for your momo filling.

Understanding the Fundamentals of Nepali Momo Dough

Hands kneading dough on a red surface, showcasing the process of baking and preparation. 
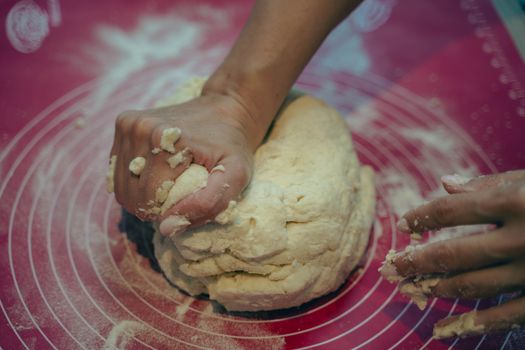
Photo: Vladimir Srajber / Pexels
The heart of any exquisite Nepali momo lies not just in its flavorful filling, but critically, in its delicate yet resilient dough. Achieving the perfect balance of chewiness, elasticity, and thinness in your momo wrapper is an art form, one that transforms a simple dumpling into a culinary masterpiece. Unlike many other dumpling varieties, authentic Nepali momo dough is remarkably simple in its composition, typically requiring only three core ingredients: all-purpose flour, water, and a touch of salt. This minimalist approach places a significant emphasis on technique, particularly during the kneading and resting phases. The quality of your flour plays a pivotal role here; while all-purpose flour is standard, a good quality, unbleached variety can contribute to a better texture and flavor profile. Water temperature is another subtle but important factor. Using lukewarm water, rather than cold or hot, helps in the initial hydration of the flour and aids in gluten development without overworking the dough. Too cold, and the dough will be stiff and harder to knead; too hot, and it can prematurely activate gluten, leading to a tough dough. The process begins with creating a well in the center of your flour, gradually incorporating water, and bringing the mixture together to form a shaggy mass. This initial stage is crucial for even hydration. Resist the urge to add too much water too quickly, as this can result in a sticky, unmanageable dough. It's always easier to add a little more water than to correct an overly wet dough by adding more flour, which can throw off the ingredient ratio and lead to a denser final product. The goal is a dough that is firm but pliable, not sticky. This foundational understanding sets the stage for the subsequent, more intensive kneading process, where the true magic of texture creation begins. Mastering this fundamental step is the first and most critical stride towards making truly authentic Nepali momo. For more insights into the cultural significance of momo, check out our article on Nepali culinary traditions.

The Art of Kneading and Resting for Perfect Pliability

Once your ingredients are combined into a shaggy dough, the real work, and arguably the most important step for dough quality, begins: kneading. Kneading is not merely about mixing; it's about developing the gluten strands within the flour. Gluten is what gives dough its elasticity, allowing it to be stretched thin without tearing, which is essential for delicate momo wrappers. A properly kneaded dough will be smooth, supple, and spring back when gently poked. The process typically involves pushing the dough away from you with the heels of your hands, folding it back over itself, rotating, and repeating. This action aligns the gluten proteins, creating a strong yet flexible network. For momo dough, aim for at least 10-15 minutes of vigorous kneading. You'll notice the dough transform from a rough, sticky mass into a cohesive, elastic ball. It should feel smooth to the touch and less sticky as you continue to work it. If the dough feels too stiff, you can lightly moisten your hands with water and continue kneading; if it's too sticky, dust your surface with a minimal amount of flour, but try to avoid adding too much extra flour to maintain the intended hydration. After the kneading process, the dough absolutely must rest. This resting period is non-negotiable for authentic momo dough. Covering the dough tightly with plastic wrap or a damp cloth and letting it sit at room temperature for a minimum of 30 minutes, and ideally up to an hour, allows the gluten to relax. When gluten is kneaded, it becomes very tight and resistant to stretching. Resting gives these gluten strands time to unwind and become more pliable. This relaxation is crucial because it makes the dough much easier to roll out thinly and evenly, preventing shrinkage and tearing. Without adequate resting, you'll find the dough difficult to work with, constantly snapping back, and your wrappers will likely be thick and uneven. The resting phase also allows the flour to fully hydrate, resulting in a more tender and flavorful wrapper. Think of it as letting the dough breathe and gather its strength before its final transformation into a perfect momo wrapper.

For more options, check out immomo.org.

Rolling Techniques for Uniform and Thin Momo Wrappers

With your perfectly kneaded and rested dough, the next critical stage is rolling it into thin, uniform circles. This is where many home cooks face challenges, but with a few key techniques, you can achieve professional-looking wrappers. Start by dividing your main dough ball into smaller, manageable portions. A common method is to roll the entire dough into a long, cylindrical log, then cut it into even, coin-sized pieces. Each piece will become a single momo wrapper. To prevent the dough from drying out, keep the pieces you're not immediately working with covered under plastic wrap or a damp cloth. Take one small piece and flatten it slightly with your palm. Lightly dust your rolling surface and rolling pin with flour, but use it sparingly; too much flour can make the wrappers dry and stiff. The goal is to roll each piece into a circle that is thin at the edges and slightly thicker in the center. This thicker center helps contain the filling and provides structural integrity, while the thin edges make for a delicate, easy-to-fold wrapper. The most effective rolling technique involves using a small rolling pin. Start by pressing down firmly in the center, then roll outwards, rotating the dough 90 degrees after each roll. Focus on applying more pressure to the edges as you roll, gradually expanding the circle. Some experienced momo makers use a technique where they roll half of the circle, flip it, and roll the other half, continuously rotating and applying pressure to thin out the edges. The ideal diameter for a momo wrapper is typically around 3-4 inches (7-10 cm), similar to the size of a small coaster. The thickness should be thin enough to be translucent when held up to light, but not so thin that it tears easily. Practice is key here; don't get discouraged if your first few aren't perfect circles. With each attempt, your hand-eye coordination and feel for the dough will improve. Proper rolling not only impacts the aesthetics of your momo but also ensures even cooking and a delightful mouthfeel. For delicious filling ideas, explore our guide to authentic Nepali momo fillings.

Common Pitfalls and Pro Tips for Momo Dough Success

Even with the best intentions, making momo dough can present a few challenges. Being aware of common pitfalls and employing some pro tips can significantly elevate your success rate. One frequent mistake is adding too much water during the initial mixing. This results in a sticky, unmanageable dough that requires excessive flour to correct, leading to a tough, dense wrapper. Always add water gradually, a tablespoon at a time, until the dough just comes together. Another pitfall is insufficient kneading. Under-kneaded dough lacks the necessary gluten development, making it difficult to roll thinly and prone to tearing. Conversely, over-kneading, though less common for home cooks, can also make the dough tough. Aim for that smooth, elastic texture that springs back. Neglecting the resting period is perhaps the most common error. A dough that hasn't rested adequately will be stiff, resistant, and frustrating to roll, leading to thick, uneven wrappers. Always allow at least 30 minutes for the gluten to relax. Here are some pro tips for achieving momo dough perfection: * **Use Room Temperature Ingredients:** While not strictly necessary for water, having flour at room temperature can aid in more consistent hydration. * **Maintain Humidity:** Keep unused dough covered at all times with plastic wrap or a damp cloth to prevent it from drying out, which makes it brittle and hard to work with. * **Consistent Thickness:** Strive for wrappers that are thin at the edges and slightly thicker in the middle for the best shape and bite. * **Practice Makes Perfect:** Don't expect perfection on your first try. The more you make momo dough, the more intuitive the process becomes. * **Experiment with Flour:** While all-purpose is standard, some experienced cooks experiment with a small percentage of bread flour for added chewiness, or a tiny pinch of baking soda for a slightly softer texture (though this deviates slightly from the most traditional recipe). However, for authentic taste, stick to all-purpose. * **Pre-portioned Dough Balls:** Once you've cut your dough log into small pieces, roll each into a small ball before flattening and rolling. This helps create a more uniform circular wrapper. By being mindful of these points, you can avoid common frustrations and consistently produce high-quality momo dough.

Comparison

FeatureAuthentic Nepali Momo DoughStore-Bought Wonton WrappersChinese Dumpling Wrappers
IngredientsFlour, Water, SaltFlour, Water, Egg, SaltFlour, Water, Salt, sometimes Egg
ThicknessThin edges, slightly thicker centerUniformly thinUniformly thin to medium
ElasticityHigh, due to kneading/restingModerateHigh
PliabilityExcellent, easy to foldGoodVery Good
Flavor ProfileNeutral, subtle flour tasteSlightly eggy, neutralNeutral
Best for Steaming
Best for Pan-Frying
Time to PrepareMediumLow (pre-made)Medium

What Readers Say

"This guide on How to Make Authentic Nepali Momo Dough transformed my homemade momos! My wrappers are now perfectly thin and so pliable, just like I remember from Nepal. The detailed kneading instructions made all the difference."

Priya Sharma · Dallas, TX

"I've tried many dumpling recipes, but the specific technique for How to Make Authentic Nepali Momo Dough outlined here is superior. The resting period really does make the dough incredibly easy to work with. Highly recommend!"

Michael Chen · Seattle, WA

"Following these steps for How to Make Authentic Nepali Momo Dough, I finally achieved momos that didn't tear during steaming. The rolling tips were crucial, and my family loved the tender texture of the wrappers."

Aisha Khan · Chicago, IL

"The instructions for How to Make Authentic Nepali Momo Dough are very thorough, though it took me a couple of tries to get the thinness just right. The dough itself was fantastic, very elastic and held its shape well."

David Lee · Portland, OR

"As someone who loves making dumplings from different cultures, this article on How to Make Authentic Nepali Momo Dough was incredibly insightful. The focus on simplicity and technique really highlights the beauty of Nepali cuisine."

Sophia Rodriguez · Miami, FL

Frequently Asked Questions

What is the most important ingredient for authentic Nepali momo dough?

While all ingredients are crucial, the quality of your all-purpose flour and the water-to-flour ratio are paramount. High-quality flour provides better gluten development, and precise hydration ensures the dough is neither too sticky nor too stiff, leading to perfect elasticity.

My momo dough is too stiff and hard to roll. What did I do wrong?

This is a common concern, likely due to either insufficient water during mixing, not enough kneading to develop gluten, or most commonly, an inadequate resting period. Ensure you knead for at least 10-15 minutes and let the dough rest for a minimum of 30 minutes to relax the gluten.

How do I make my momo wrappers thin without tearing?

Achieving thin, tear-free wrappers comes down to proper kneading, adequate resting, and effective rolling technique. Focus on rolling from the center outwards, applying more pressure to the edges, and rotating the dough frequently. The resting period is key to making the dough pliable enough to stretch without tearing.

Is it worth making momo dough from scratch compared to buying pre-made wrappers?

Absolutely. Making momo dough from scratch allows for superior texture, freshness, and pliability that store-bought wrappers often lack. Homemade dough has a more neutral flavor that truly lets the momo filling shine, and its elasticity makes it much easier to fold into traditional momo shapes without cracking.

How does Nepali momo dough differ from Chinese dumpling dough?

While both are flour-based, Nepali momo dough is typically simpler, often just flour, water, and salt, resulting in a slightly chewier texture. Chinese dumpling dough sometimes incorporates egg or different flour blends, which can lead to a softer or more tender wrapper. The rolling technique and desired thickness at the edges also vary subtly.

Who should attempt to make authentic Nepali momo dough?

Anyone with a passion for cooking, an appreciation for traditional cuisine, or a desire to elevate their homemade dumpling game should try making authentic Nepali momo dough. It's a rewarding process that significantly enhances the overall momo experience, perfect for home cooks of all skill levels willing to practice.

Are there any health considerations when making momo dough?

Momo dough itself is quite healthy, consisting primarily of flour and water. The main consideration is ensuring proper hygiene during preparation and consuming it as part of a balanced meal. For individuals with gluten sensitivities, traditional momo dough is not suitable due to its high gluten content.

What are the future trends for momo dough preparation?

Future trends might include experimentation with alternative flours for gluten-free or healthier options, though these would deviate from traditional authenticity. There's also a growing interest in automated or semi-automated dough preparation methods for large-scale production while maintaining a homemade feel.

Embark on your culinary adventure and master How to Make Authentic Nepali Momo Dough today. With our detailed guide, you're not just making food; you're crafting a piece of Nepali culture in your own kitchen. Get ready to impress with perfectly pliable, delicious momo wrappers!

Topics: authentic Nepali momo doughmomo wrapper recipehomemade momo doughNepali dumpling skinperfect momo texture
Leo List
Brampton weed
Adultwork